A craft is a hobby that involves producing an item. It includes weaving, carving, macrame, sewing, quilting, pottery and much more. Kids love to indulge in fun craft activities whether it is just another school day or summer break. Not only do their creations make wonderful decorations, but it also keeps them occupied for hours. With the many festivals coming up the next year, we have listed a few crafts for kids and parents to enjoy.
What are the Benefits of Art and Craft?
Motor skills
Kids benefit greatly from art and craft activities. When they use their hands to manipulate materials, they develop fine motor skills. Additionally, their bilateral coordination skills also improve as they use both their hands. Studies show that the quicker a child’s motor skills, the sooner they learn to do things like eating and tying shoelaces by themselves.
Literacy skills
It includes listening, reading and understanding the material. When young children make crafts, listen, read and understand the instruction. Furthermore, they also tend to talk about their work, thus, improving their communication skills. You can encourage your kids by asking questions like ‘Why did you choose this colour?’ or ‘Tell me what you made’.
Math Concepts
People believe math to be separate from art and craft activities. However, this is not true. Art and crafts involve shapes, counting and measuring the length or sizes of materials and diagrams. Thus, kids are bound to learn basic skills in math while creating whatever their hearts desire.
Creativity
Art lets kids develop their creativity. It is with a child’s experience in process of creating art rather than the finished product. It is an outlet for self-expression, thus enabling mental growth. Additionally, it also helps develop thinking and problem-solving skills. Furthermore, it is not to be confused with talent or skill or even doing something better than others. It is simply about exploring, discovering, thinking as well as imagining a particular scenario.
Self-Esteem
Indulging in art and craft activities give children a sense of achievement, thus, letting them take pride in their creation. This in turn builds confidence. In addition, making art lets children discover that it’s fine to make mistakes and also that doing something wrong can lead to another wonderful idea.
Quality Time with Parents for Parent Bonding
What better way to spend time with your kids than to do arts and crafts together. Not only do you get quality bonding time, but you also build lifelong memories with your children in the process. Furthermore, you can talk to your children about what they feel, their ideas as well as their interests. And as an added bonus, your child is not looking at a screen during that time.
Festival Crafts for Kids
Making crafts with your children during the festivals has many benefits including,
- Firstly, you make new, long-lasting memories during the time you spend with your children. The crafts become something to reminisce about in future when your kids are older.
2. Secondly, it encourages family bonding time
3. Lastly, crafting keeps your children busy, and thus, out of your hair while you prepare for the festival.
In this article, we will look at some fun crafting ideas during festivals like Ganesh Chaturti, Diwali and Christmas.
Fun Craft for Kids during Ganesh Chaturthi
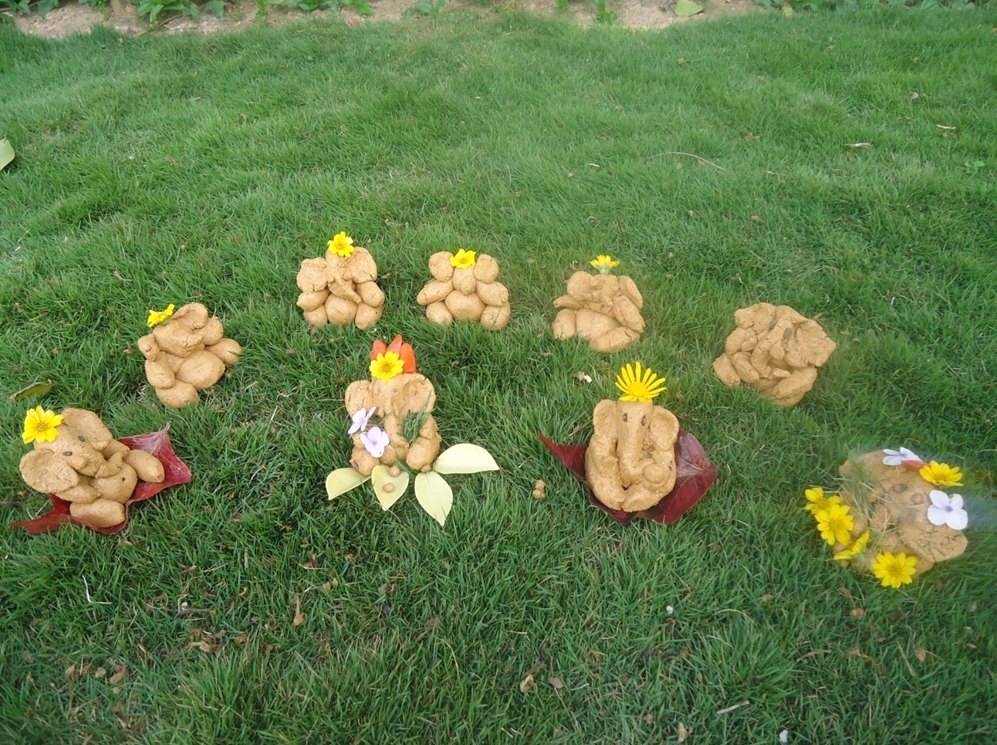
DIY eco-friendly clay Ganesh
Modelling is a fun, sensory activity to try with your kids. Lets us see how you can use easily available materials to create a Ganesh for the festival.
Materials required
| Items required | Quantity |
| Water | 1 bottle |
| Natural clay | 1 cup (depending on the size of the idol) |
| Large plastic bowl | 1 |
| Beads for eyes | |
| Flowers |
Steps
- Take some natural clay in a large plastic bowl. Add some water. Then mix and kneed it till it is the consistency of chapatti dough. Make two rounds, a smaller one and a big one.
- Place the smaller ball over the larger one. Then press it slightly so that it sticks together. Remember to be gentle as you do not want to deform the shape. Roll more clay into slender cylinders with a tapering edge. Attach two for the legs and two for the hands.
- Make another cylindrical shape for the trunk. Attach it to the face of the idol. Make two small balls. Flatten it to make the years. Attach the ears the Ganesh. Finally, make and attach two small conical shapes tusks next to the trunk.
- Use two black beads and press them into the clay to make eyes. You can further decorate him with clay jewels, small beads or Kundan stones. Lastly, Your Ganesh is now ready.

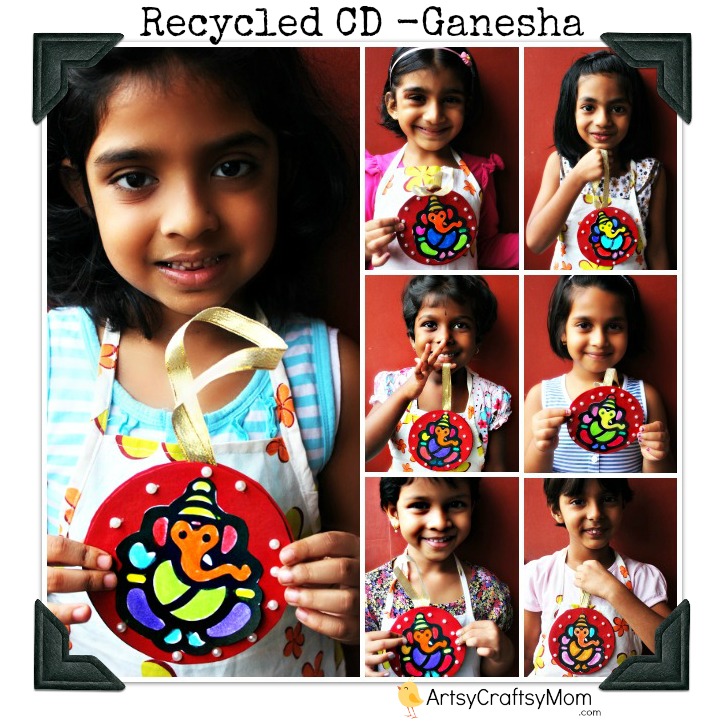
CD Ganesh wall or car hanging
Materials required
| Items required |
| An old CD |
| Red handmade paper |
| Crayons |
| Glue |
| scissors |
| sequin |
| Stapler |
| Golden lace |
| stickers |
Steps
- Trace the CD on a red sheet of paper. Cut out two circles. Staple a golden ribbon or lace on each side of the circle.
- Stick the two circles onto the CD. Draw a Ganesha on a piece of paper. Alternatively, you can also use an outline printout of Ganesha. Then, have your kids color the image using crayons.
- You will need two such images. Finally, stick the image on both sides of the CD. Embellish with beads, sequins or glitter. Now, your wall hanging is ready.
Easy Diwali Crafts for Kids
Make Diwali lanterns with paper
Materials required
| Items required |
| Cardstock paper, Black or any dark shade |
| Tissue paper, cellophane or thin construction paper, colours of your choice |
| Pencil or pen |
| X-acto knife |
| Scissors |
| Craft glue |
| Candle (Tea lights are safest) |
Steps
- Decide what size you want your lantern to be. Here we have decided to make ours 8 inches tall and 4 inches wide.
- Cutting your black cardstock 8 inches wide and 12.5 inches long. The lantern itself will require 12 inches. We have left 0.5 inches to attach the side.
- Design your paper lantern. Draw your design onto the sheet of paper. Alternatively, you can use stencils to draw a pattern too. Then, cut out the image such that the lantern has a thick border on the edges.
- Cut out the design. Then glue coloured craft paper or cellophane behind the lantern.
- Once you have glued the colour paper, assemble the lantern by applying glue on the extra 0.5 inches of paper. Bring the other open side of the cardstock and place it on the glued part.
- Allow the glue to dry and add some finishing touches.
- Your paper lantern is now ready. Place a candle inside the lantern. Light up the candle and see the magic.

Handmade Diwali cracker greeting card
Materials required
| Items required |
| 12 by 8 inch white or red Cardstock |
| Patterned or plain foam in different colours |
| Golden pipe cleaners |
| Glitter glue |
| shiny stickers |
| Glue |
| Scissors |
| Fine glitter powder |
Steps
- Fold an 8 by 12-inch cardstock in half to make a 6 by 8-inch card.
- Cut the foam sheet into a cracker shape. You will need one rectangle 2 by 4 inches in size and one triangle 2.5 inches tall.
- Cut the pipe cleaners into three one inch strips
- Stick them onto the card stock using Fevicol or a glue gun. You will need to place the rectangle at an angle. Then stick the triangle on one end and the pipe cleaners at the other. The final image should look like a rocket
- Decorate with stickers, glitter or sequins, then, add your greeting.
- Your card is now ready.
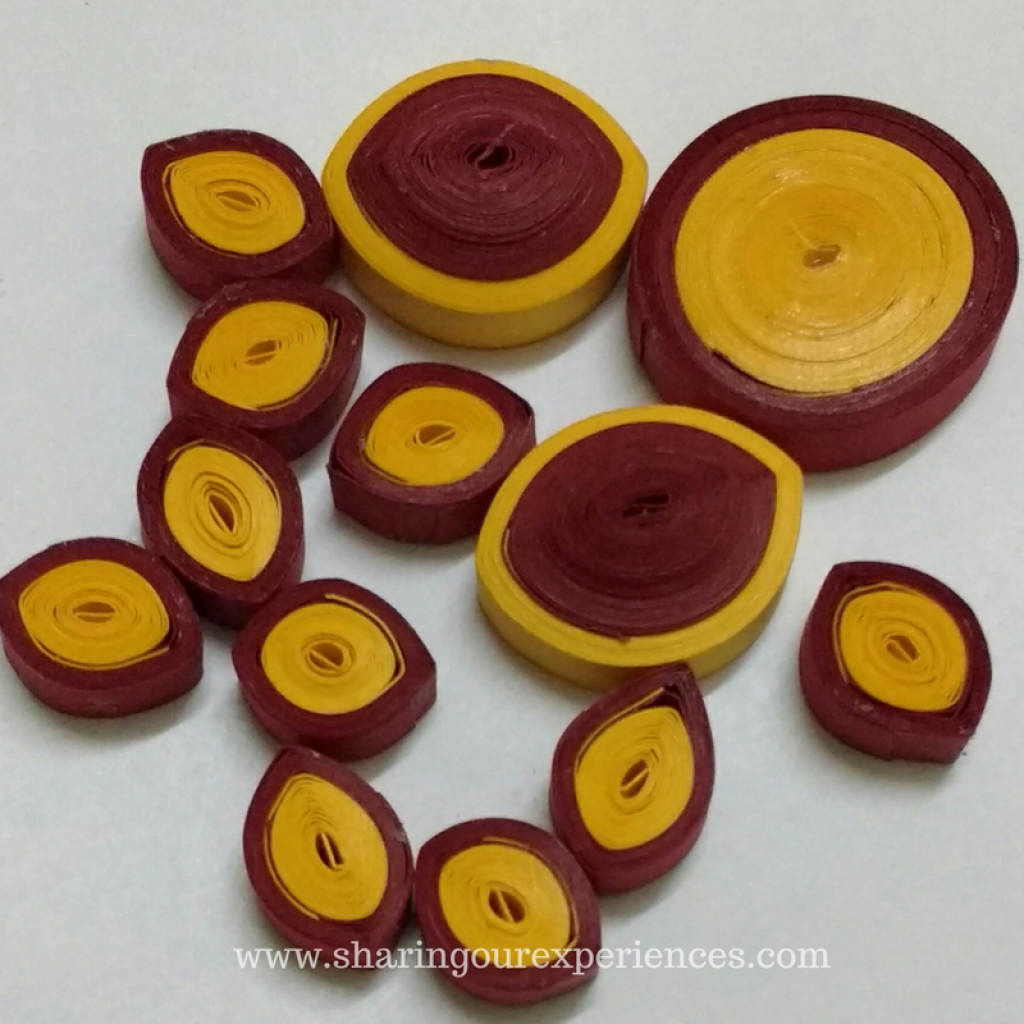
Paper Quilled Rangoli
Materials required
| Items required |
| Paper quilling strips |
| White or Cream craft paper |
| Slotted quilling tool |
| Craft glue |
| Scissors |
Steps

- Select a colour of your choice for the centre of the design. Take a long strip and coil the paper tightly.
- Place the coil on a flat surface and allow it to loosen up. Repeat this as many times as you need, then move on to the next layer.
- Quill some loose coils out of your second colour. Pinch the coil at any point to form a teardrop shape. Glue the open end to keep the shape intact.
- Similarly, make more teardrop shapes. Use more colours to do so. You can also create other shapes like a crescent moon shape, swirls or tight coils.
- Take a while or cream cardstock. Begin glueing your coils beginning from the centre of the design.
- Star with the coils. Glue the teardrop shapes in the next layer. Finally, place the other shapes in between the teardrop shape. Once you are satisfied with the design, cut a circular zigzag border around it.

DIY clay Diya
Materials required
| Items required |
| Small beads |
| Air-dry Clay or Playdough |
| Rolling pin |
| Plastic knife |
| Stamps |
| Ink Pad |
| Small bowl |
| Paint or markers |
| Votive tea light candle or battery operated tea light candle |
Steps
- Roll out a thin smooth layer out of playdough or air dry clay. Place a bowl upside down and trace its shape on the clay. Then, stamp the clay using premade or DIY stamps made from cardboard.
- Colour your impressions using paint. Then, cut out the circle and gently place it in a smaller bowl. Add beads, sequins or glitter to decorate your Diya.
- Let the clay dry. Once dry remove it from the bowl. Add in a tea light candle during the night.
Colourful Rakhabandhan Crafts for Children
Quilled Paper Rakhi
Materials required
| Items required |
| Paper quilling strips of different sizes |
| Thin satin ribbon |
| Kundan or stone Stickers |
| Glue |
| Scissors |
Steps
- Make different shapes using a colour of your choice. We have used yellow and maroon.
- Glue sequins or round stone stickers at the centre of each quill.
- Glue the quilled paper in a flower shape. Place a circle at the centre and glue the petals on. Also, glue two petals on either end.
- Finally, glue the flower on a stone lace. Then, Your rakhi is ready.
You can refer to this video for further assistance.
Craft Ideas for the Holidays
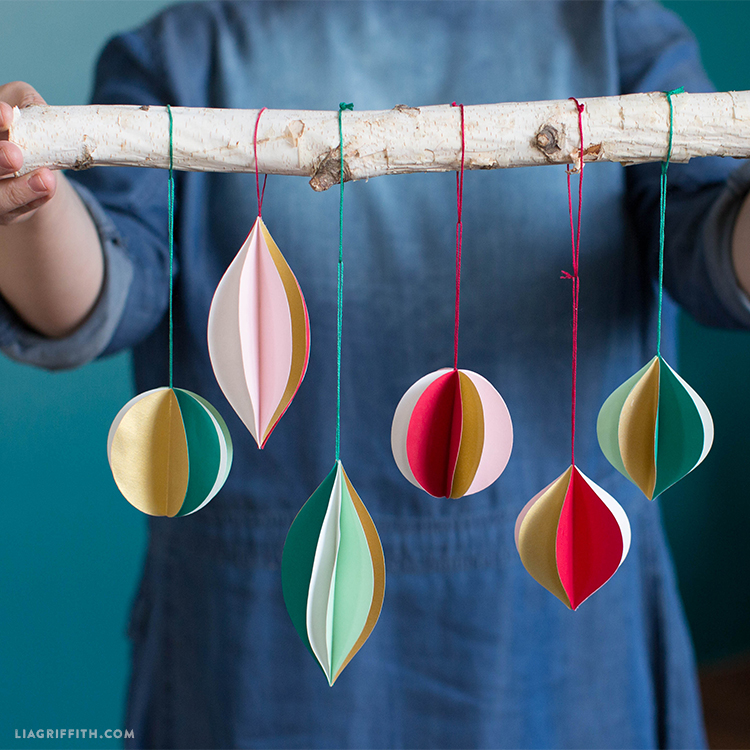
Retro Ornaments
This is a fun craft for kids made out of paper.
Materials required
| Items required |
| Tools |
| Cutting Machine |
| Scissors |
| Flat Paintbrush |
| Cricut Scraper Tool or Bone Folder |
| Materials |
| Thick card stock of different colours |
| Embroidery Floss or Thread |
| Tacky Glue |
Steps
- Download the pattern given below.
- Using scissors, cut your paper according to the pattern. You will need two for each colour.
- Then, fold each piece in half lengthwise and glue the halves together. Be sure to match up the edges as close as possible.
- Glue the four pieces to make half the ornament and 8 to make a complete one.
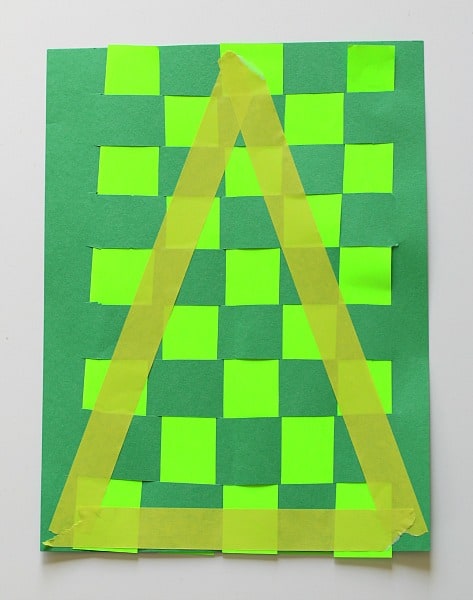
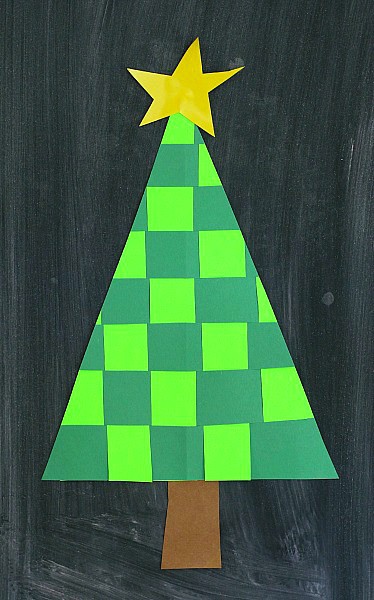
Women Paper Christmas Tree
Materials required
| Items required |
| Construction paper in contrasting green colours (dark and light), yellow and brown. |
| Scissors |
| Glue |
| Masking tape |
| Optional |
| Sequins |
| Dot stickers |
| Pom-poms |
| Glitter |
Steps
- Fold a sheet of dark green construction paper in half. Count one-inch slits down the fold in the centre. Remember not to cut the slit all the way.
- Cut the light green sheet of paper vertically into one-inch strips.
- Then, weave the light green strips into dark green paper.
- Using masking tape mark out a triangular shape onto your woven paper. The tape will hold the strips in place while cutting. Cut along the middle of the masking tape.
- Flip your tree to the front and glue down ant ends that are not secure. Then, cut a star out of yellow construction paper and glue it to the top of your tree. Similarly, cut a rectangle out of brown construction paper. Then, glue it to the bottom of your tree.
- Make the rectangle a truck by drawing wood grains on it. Finally add other embellishments like pom-poms, stickers, tissue paper etc.
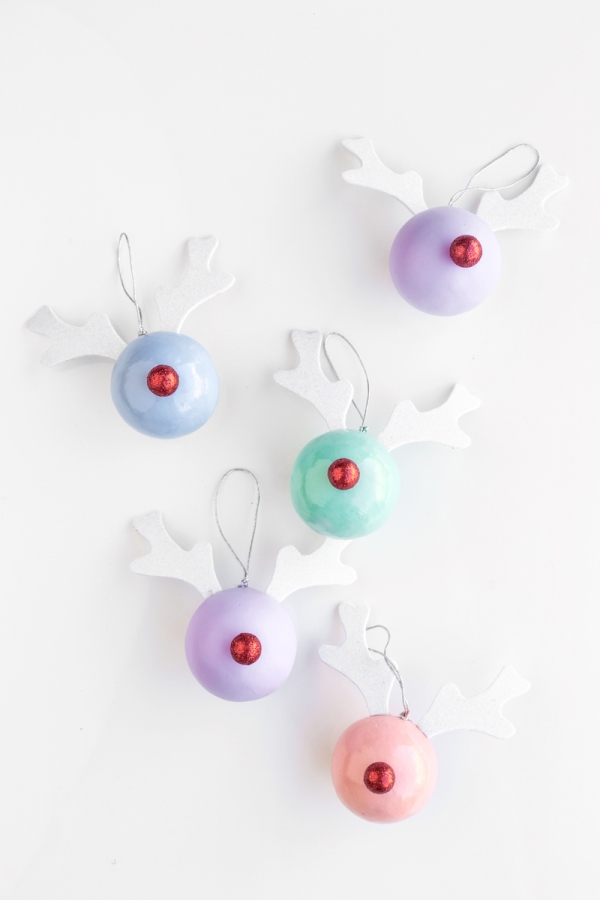
Rudolf Christmas ornament
Materials required
| Items required |
| Round Christmas ornaments |
| Red Pom Poms |
| Craft Foam or thick cardstock |
| Hot Glue Gun |
| Scissors |
Steps
- Place pom-pom at the centre of a white Christmas ornament and glue it down.
- Using a thick white cardstock or foam, cut out 2 antler shapes for each ornament. Glue it on one side of the ornament in the centre.
- Your Rudolph ornament is ready.
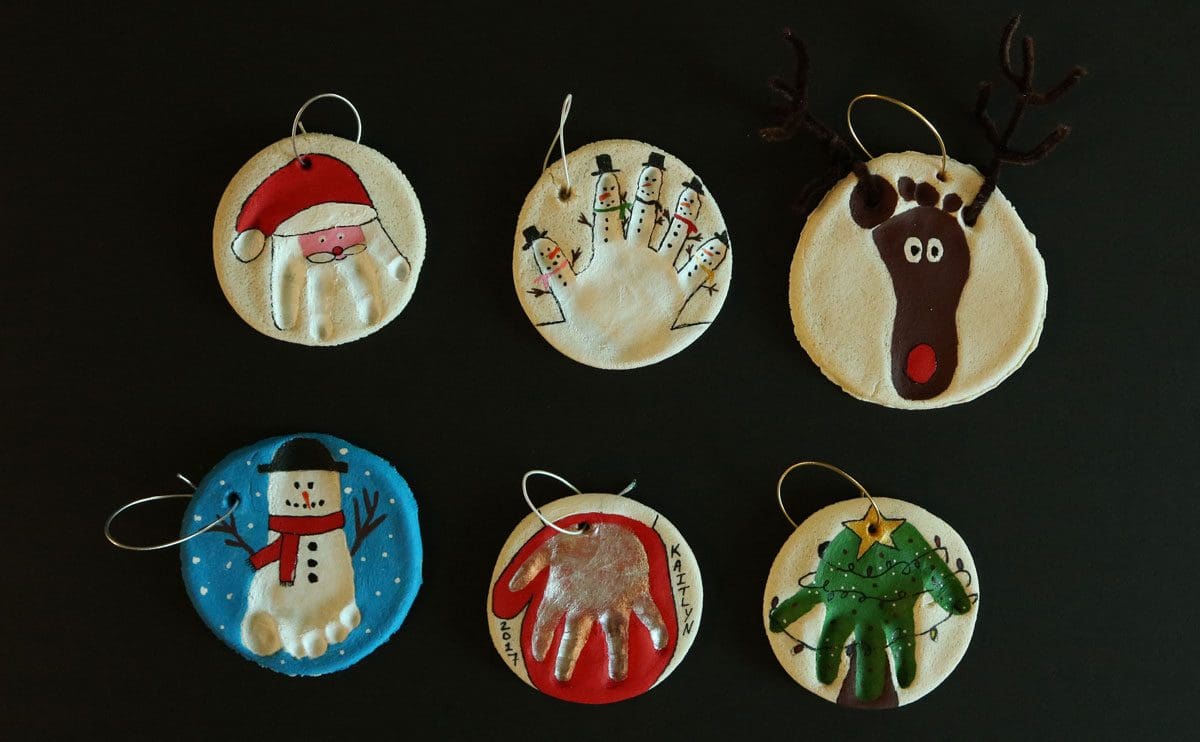
Salt dough Christmas gift tags.
Materials required
| Items required | Quantity |
| Salt dough | |
| Flour | 2 cups |
| Salt | 1 cup |
| Lukewarm Water | 1 cup |
| Items required |
| Gift tags |
| Stamps & Ink |
| Oven |
| Glitter |
| Acrylic Paint |
Steps
- Firstly, mix the flour and salt together. Then slowly mix in lukewarm water until you obtain a dough-like consistency.
- Knead the dough for a minute. You now have a nice ball of salt dough. On a lightly floured counter, roll out your dough into a half-inch thick layer. Using cookie cutters cut out any Christmas shape you want.
- Then let the cut shapes dr. To speed up the process, bake it at 200 degrees Fahrenheit for 2 to 3 minutes. Thicker pages required more time to dry.
- Once the clay is dry you can paint it or add other decorations like glitter, sequins or beads.


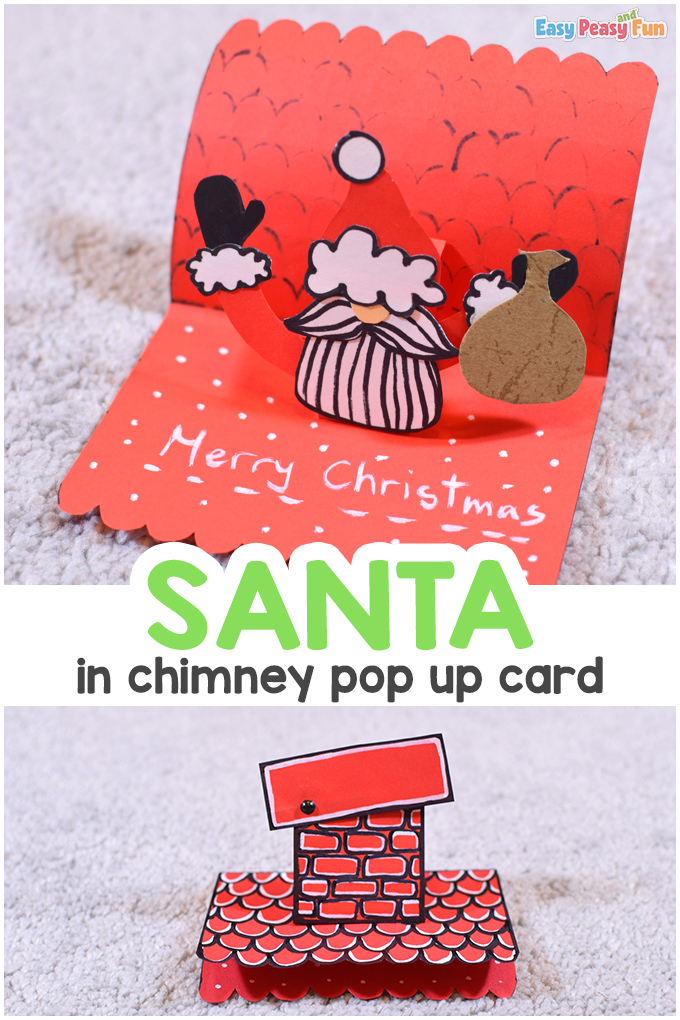
Santa chimney pop up card
Materials required
| Items required |
| red cardstock |
| red colour paper |
| white colour paper |
| scissors |
| glue |
| split pin |
| black marker |
| white marker |
| pale orange colour paper |
| black colour paper |
| pencil |
| eraser |
| ruler |
| brown colour paper |
Steps
- Fold the red sheet of paper in half and draw a 7 cm by 10 cm rectangle on it. Then cut the rectangle out. This is the base of the card.
- Draw horizontal lines 1 cm wide using a pencil. Then, draw vertical lines one cm wide. You will now have a grid pattern for the roof.
- Using a white pen or marker, start drawing the first row of tiles. Ensure that they are equal in size. Continue till you fill all grids. Using a scissor, give the rectangular card base a more roof-like shape.
- Then outline the white line using a black marker. To make the chimney, first, draw and then cut a 5 cm by 4.5 cm rectangle from the red sheet of paper.
- Draw a 1 cm wide part on the rectangle. Make a fold at this point.
- Draw some bricks on the chimney with a white marker and then outline it with a black marker.
- Apply glue to the folded part and then glue it onto the roof.
- To create the chimney cap, first, draw a rectangle 2.5 cm by 6.5 cm in size. Cut it out and outline it with a black marker. Then draw a white rectangle close to the black one.
- Place the chimney cap over the chimney and pass a split pin through both pieces. Check if the cap opens smoothly.
- Cut two small rectangles. Draw and cut black boots and glue them on the rectangles.
- Open the chimney cap and glue the legs behind the chimney. Ensure that the boots and some of Santa’s legs are visible over the chimney.
The Pop up Mechanism
- To create the pop-up mechanism, begin by creating a 2.5 cm by 10 cm sized rectangle. Cut it out and divide it into 4 equal parts. They fold them and make a square.
- Apply some glue to this pop-up piece and glue in the middle it inside the card.
- Draw and cut out a Santa with a white beard, moustache and red hat. You can add cotton to the beard to give it some texture.
- Glue the head on the pop-up mechanism. Make Santa’s hands-on black paper. Draw him some gloves.
- Then attach the hand behind the head of Santa. Draw a bag on brown coloured paper. Cut it out and glue it on Santa’s hand.
- Finally, write a Christmas message inside the card. Your card is ready.
Frequently Asked Questions
What are Craft Skills?
A Craft skill refers to something that is used specifically to create an item. This includes learning how to use tools, spaces and equipment. Like sports or a video game, this is something you learn over time.
Do parents need to assist their kids with every craft?
No, it is not necessary to do so. However, it is something no parent should miss out on as crafting is a good time to bond with your kids. Keep your camera ready to capture their creation and the dedication and hard work behind it. You can also indulge in some roleplaying to enhance the experience for your child.
What is the importance of zero waste crafts?
Zero waste refers to the circular flow of material that allows them to be used over and over again, thus, reducing trash and landfill space. Additionally, zero waste allows for fewer toxins to be released into the environment and also reduce water waste that would otherwise be used in the production process.
Practising zero waste crafts help children understand the world they live in, thus, inspiring them to put in the effort required to save it. Zero-waste may not be the solution to the world’s garbage problems, but it is a very good place to start.
What are some zero waste craft for kids?
Here are some zero waste crafts for kids.
What materials should you use for festive zero waste crafts?
Only use materials you already have at home. Reuse coloured paper scraps, ribbons, paint, crayons etc. You can also reuse paper, cardboard, old clothes, metals and plastics for your festive crafts for kids.
I have never crafted before. Can I still make festive crafts with my children?
Absolutely. The above festive crafts are for kids and adults alike. They range from beginner-friendly crafts to more advanced ones. Thus, if you are new to the crafting scene you will still be able to make some of the crafts mentioned above. All you need to do is follow some instructions and have fun. Create memories and the perfect craft item that you can display around your home.
Conclusion
Tune in for more information or check out our site Podium School…